Twin-Span Self-Centering Marking Gauge
A printed center-line gauge with two pin spans, so one tool marks the center of anything from a thin slat to the wide face of a 2×4.
Twin-Span Self-Centering Marking Gauge
A printed center-line gauge with two pin spans, so one tool marks the center of anything from a thin slat to the wide face of a 2×4.
Date: 2026-10-05 Category: Tools and Workshop Modeling difficulty: Beginner Estimated print: ~1.4 h total · ~24 g PLA (estimate) Suggested price: $14–$20 printed · $4 digital file (estimate) Status: Concept
Description
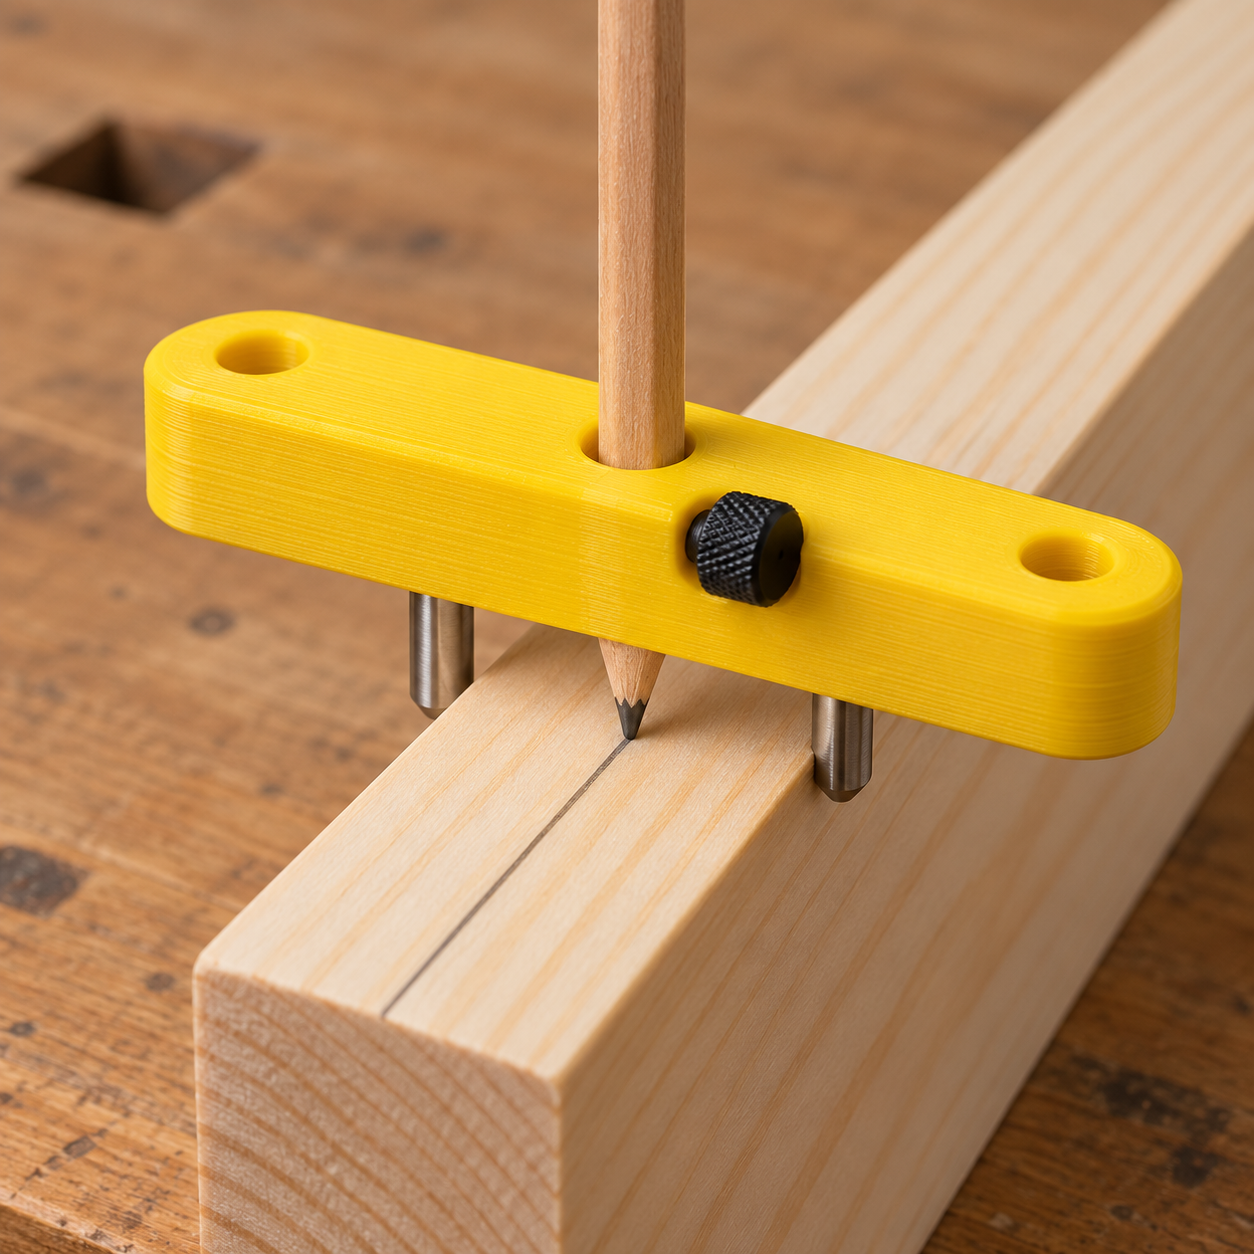
A flat bar, 130 mm long, with a pencil standing upright through its middle and two steel pins pointing down from the underside. Lay it across the edge of a board, twist it until both pins touch opposite faces, and the pencil is on the center line. Keep both pins in contact and pull the tool along the board to draw the line. It works on straight, tapered and curved stock because the pins re-center the pencil at every point.
The bar has four pin holes. The inner pair, 50 mm apart, handles boards up to 44 mm thick. Move the same two pins to the outer pair, 100 mm apart, and it handles up to 94 mm, which covers the 89 mm face of a 2×4. A small thumbscrew locks the pencil at whatever height you want, and a disc magnet in the top lets it hang on the saw table or a steel rule.
It's one printed part plus four pieces of hardware from any fastener bin, and it can be modeled in an afternoon.
Why it sells
The commercial version of this tool exists and has a price. Rockler's Center/Offset Marking Tool uses two guide posts and a center pencil hole, takes stock "up to 1-1/2-in. wide or thick", and sold for $9.99 when Woodworker's Journal reviewed it (Woodworker's Journal, Woodshop News). Woodworkers have been making their own for years: Popular Woodworking ran a reader tip for a stick with a pencil hole and two nails (Popular Woodworking), and a German makerspace keeps a wood-and-aluminium version with two pin settings in its shop (CoMakingSpace wiki).
Printed versions already circulate. MakerWorld hosts several center finders, including a board center finder (MakerWorld 1414270), and a "Self Centering Gauge / Marker" is sold as a file on Gumroad (Gumroad). One 2026 seller guide puts "tools and jigs" among the five Etsy categories that convert for 3D-print sellers (StackSheriff).
The gap: the store-bought tool tops out at 38 mm, and the printed ones I found use a single pin spacing. This one covers both slats and 2×4 faces with the same two pins.
Who buys it
Hobby woodworkers and DIYers who mark mortises, dowel holes and hinge lines, and who already shop Etsy and MakerWorld for shop gadgets. It's a $15 stocking-stuffer for someone with a garage shop, and an easy add-on for sellers who already list jigs.
Design overview
- Straight bar 130 × 22 × 14 mm with full-radius ends, printed flat with no supports.
- Center pencil bore, Ø8.2 mm, sized for standard round and hex wooden pencils.
- Two pin spans on one axis: inner pair 50 mm apart (capacity 44 mm), outer pair 100 mm apart (capacity 94 mm). The second span is the feature the listed tools don't have.
- Two Ø6 × 30 mm steel dowel pins, push fit, protruding 16 mm below the bar.
- M4 thumbscrew and captive nut lock the pencil height.
- Ø10 × 3 mm magnet pocket in the top face for hanging the tool on steel.
- Dot marks instead of text: one dot beside each inner hole, two dots beside each outer hole.
Dimensions
| Measurement | Value (mm) | Notes |
|---|---|---|
| Overall width (X) | 130 | Bar length, full-radius ends (R 11) |
| Overall depth (Y) | 22 | Bar width |
| Overall height (Z) | 14 | Bar thickness; pins add 16 below |
| Wall thickness | 1.9 | Thinnest wall: between pencil bore and nut slot |
| Pencil bore diameter | 8.2 | Through, at origin |
| Pin hole diameter | 6.2 | Through, ×4 |
| Inner pin hole centers | ±25 | On X axis, y = 0 |
| Outer pin hole centers | ±50 | On X axis, y = 0 |
| Pin protrusion below bar | 16 | 30 mm pin, top flush with bar top |
| Capacity, inner span | 44 | 50 c-c minus 6 pin diameter |
| Capacity, outer span | 94 | 100 c-c minus 6 pin diameter |
| Thumbscrew hole diameter | 4.4 | Along +Y from bore to side face, at z = 7 |
| Nut slot | 8.3 × 3.6 × 10.5 | X × Y × Z, y = 6.0 to 9.6, z = 3.5 to 14, open at top |
| Magnet pocket | Ø10.2 × 3.2 deep | Top face, center at x = +12.5 |
| Dot marks | Ø2 × 0.6 deep | Top face, see modeling guide |
Parts list
| Part | Qty | Material | Size X×Y×Z (mm) | Print orientation | Supports |
|---|---|---|---|---|---|
| Gauge bar | 1 | PLA | 130 × 22 × 14 | Bottom face (pin side) down | none |
Hardware and non-printed parts
- Ø6 × 30 mm steel dowel pin (hardened, h6) ×2
- M4 × 10 mm knurled-head thumbscrew ×1
- M4 hex nut, 7 mm across flats × 3.2 mm ×1
- 10 × 3 mm N52 neodymium disc magnet ×1, fixed with a drop of cyanoacrylate glue
Fits and tolerances
- Steel pin ↔ pin holes (push fit): holes modeled at Ø6.2 for a Ø6.0 pin, 0.1 mm per side. That's tighter than the 0.2 mm sliding fit because the pins have to stay put while you drag the tool, but still come out by hand when you move them between spans. FDM holes usually print 0.1–0.2 mm undersize, so the as-printed fit lands at light push to light press. If a hole is too tight, run a 6 mm drill through it by hand.
- Pencil ↔ pencil bore (sliding): Ø8.2 bore for a pencil of about Ø7.5 round or 8.0 across the hex corners. The thumbscrew does the locking, so the bore can be loose.
- M4 nut ↔ nut slot (drop-in): slot 8.3 wide for a nut 8.1 across corners, 3.6 thick for a 3.2 mm nut, so 0.1 and 0.2 mm per side. The screw keeps the nut from falling out.
- Magnet ↔ pocket (glued): Ø10.2 × 3.2 pocket for a 10 × 3 magnet, 0.1 mm per side plus 0.2 mm depth for glue.
Modeling guide
Origin: center of the bar's bottom face. +X along the bar's length, +Y across its width (thumbscrew side), +Z up through the top face. The bar prints bottom face down.
- Outline. Sketch on XY: a slot shape 130 long and 22 wide centered on the origin (straight sides from x = −54 to +54, full-radius ends R 11).
- Extrude 14 in +Z.
- Pencil bore. Sketch a Ø8.2 circle at (0, 0) on the top face. Cut through all.
- Pin holes. Sketch four Ø6.2 circles at (−50, 0), (−25, 0), (25, 0), (50, 0) on the top face. Cut through all.
- Thumbscrew hole. Sketch a Ø4.4 circle on the +Y side face (y = 11) centered at x = 0, z = 7. Cut in −Y to y = 4.1 (it breaks into the pencil bore).
- Nut slot. Sketch on XY at z = 14 a rectangle from x = −4.15 to 4.15, y = 6.0 to 9.6. Cut down 10.5 to z = 3.5.
- Magnet pocket. Sketch a Ø10.2 circle at (12.5, 0) on the top face. Cut 3.2 deep.
- Dot marks. On the top face, Ø2 circles cut 0.6 deep at (±25, 7) for the inner holes, and at (±48, 7) and (±52, 7) for the outer holes.
- Chamfers. 0.6 × 45° on the bottom edge of the pencil bore and of all four pin holes, so a pin starts straight and the pencil point clears. 0.5 × 45° on the bar's top outer edge.
- Leave the bottom outer edge square. A chamfer there causes elephant-foot cleanup problems and the bottom face never touches the work.
Print settings
| Setting | Value |
|---|---|
| Material | PLA (PETG also fine) |
| Nozzle | 0.4 mm |
| Layer height | 0.2 mm |
| Walls / perimeters | 4 |
| Infill | 40% gyroid |
| Supports | None |
| Brim / adhesion | None |
| Notes | Four walls give the pin holes enough material to grip. No pause needed; the magnet is glued in after printing. |
Assembly
- Glue the magnet into its pocket with one drop of cyanoacrylate, top flush or slightly below.
- Drop the M4 nut into the nut slot from above, flats horizontal.
- Thread the thumbscrew in from the +Y side until it shows inside the pencil bore, then back it off.
- Push the two steel pins into the inner holes from the top until their tops sit flush with the top face. Tap with a mallet if tight.
- Insert a pencil from the top, point down, until the point sticks out about 0.5 mm below the bar's bottom face. The bar rides on the board's edge, so that's where the point needs to be. Tighten the thumbscrew.
- To switch spans, push the pins out from below with a pencil end and press them into the outer pair.
Variants and upsells
- Imperial span set: inner pins at 2 in and outer at 4 in centers, for US shops that think in fractions.
- Mechanical pencil bore: a 0.7 mm mechanical-pencil version with a smaller bore and a matching thumbscrew, sold as a second SKU.
- Third span: a 160 mm bar with holes at ±75 for 6-in stock (fits the 220 mm bed lying flat).
- Shop-color bundle: three gauges in yellow, orange and green for shops that lose tools.
- Bundle with offset marker: pair it with a simple edge-offset gauge as a two-tool marking kit.
Selling and distribution
Etsy suits the printed version with hardware included, since buyers want it to work out of the bag. MakerWorld and Printables suit the file; a free basic version on Printables with a paid parametric version on Cults3D is a common split. Pricing: about 24 g of PLA ($0.50), two dowel pins and an M4 screw and nut ($1.50 in bulk), a magnet (~$0.30), and 1.4 h of machine time. At $14–$20 there's room for Etsy fees and shipping in a padded envelope (all estimates). Sell both: the file reaches makers who own printers, the printed tool reaches woodworkers who don't. License the file CC BY-NC so other sellers can't resell prints of it, and sell a separate commercial license if a print-farm asks.
Listing keywords: center line gauge, self centering marking gauge, woodworking center finder, board center marker, dowel center finder, mortise marking tool, 2x4 center marker, pencil marking gauge, woodworker gift, shop jig, 3d printed woodworking tool.
Risks and IP notes
- Pin holes wear loose with repeated swaps. Mitigation: four perimeters around the holes, and sell a PETG option for heavy users.
- Accuracy depends on pencil wobble. Mitigation: the 14 mm bar height and thumbscrew keep the pencil vertical; note in the listing that a sharp pencil gives about ±0.5 mm (estimate).
- Price race against a $9.99 retail tool. Mitigation: list on the capacity difference (94 mm vs 38 mm) rather than on price.
- IP check. The two-pin center gauge is an old shop idea, published as a reader tip in Popular Woodworking. Search Google Patents and USPTO design patents for "center marking gauge" before listing, and never use "Rockler" in titles or tags.
- Magnet safety. A loose small magnet is a swallowing hazard. Mitigation: glue it in and label the listing "not a toy, keep from children".
Resource links
- Rockler Center/Offset Marking Tool (Woodworker's Journal): the retail two-post center marker, its 1-1/2 in capacity and $9.99 price
- Rockler introduces dual-purpose marking tool (Woodshop News): trade-press launch of the same retail tool
- Friday's Tip: Self-Centering Gauge (Popular Woodworking): the shop-made stick-and-nails version and how it's used
- Centerline Gauge (CoMakingSpace wiki): a makerspace gauge with two pin settings for different widths
- Center finder (MakerWorld 1414270): an existing printed board center finder
- Self Centering Gauge / Marker (Gumroad): a self-centering gauge sold as a paid file
- Best 3D Prints to Sell on Etsy in 2026 (StackSheriff): lists tools and jigs among the top Etsy categories for print sellers
More from 3D Print Designs