Fold-Down Appliance Cord Winder
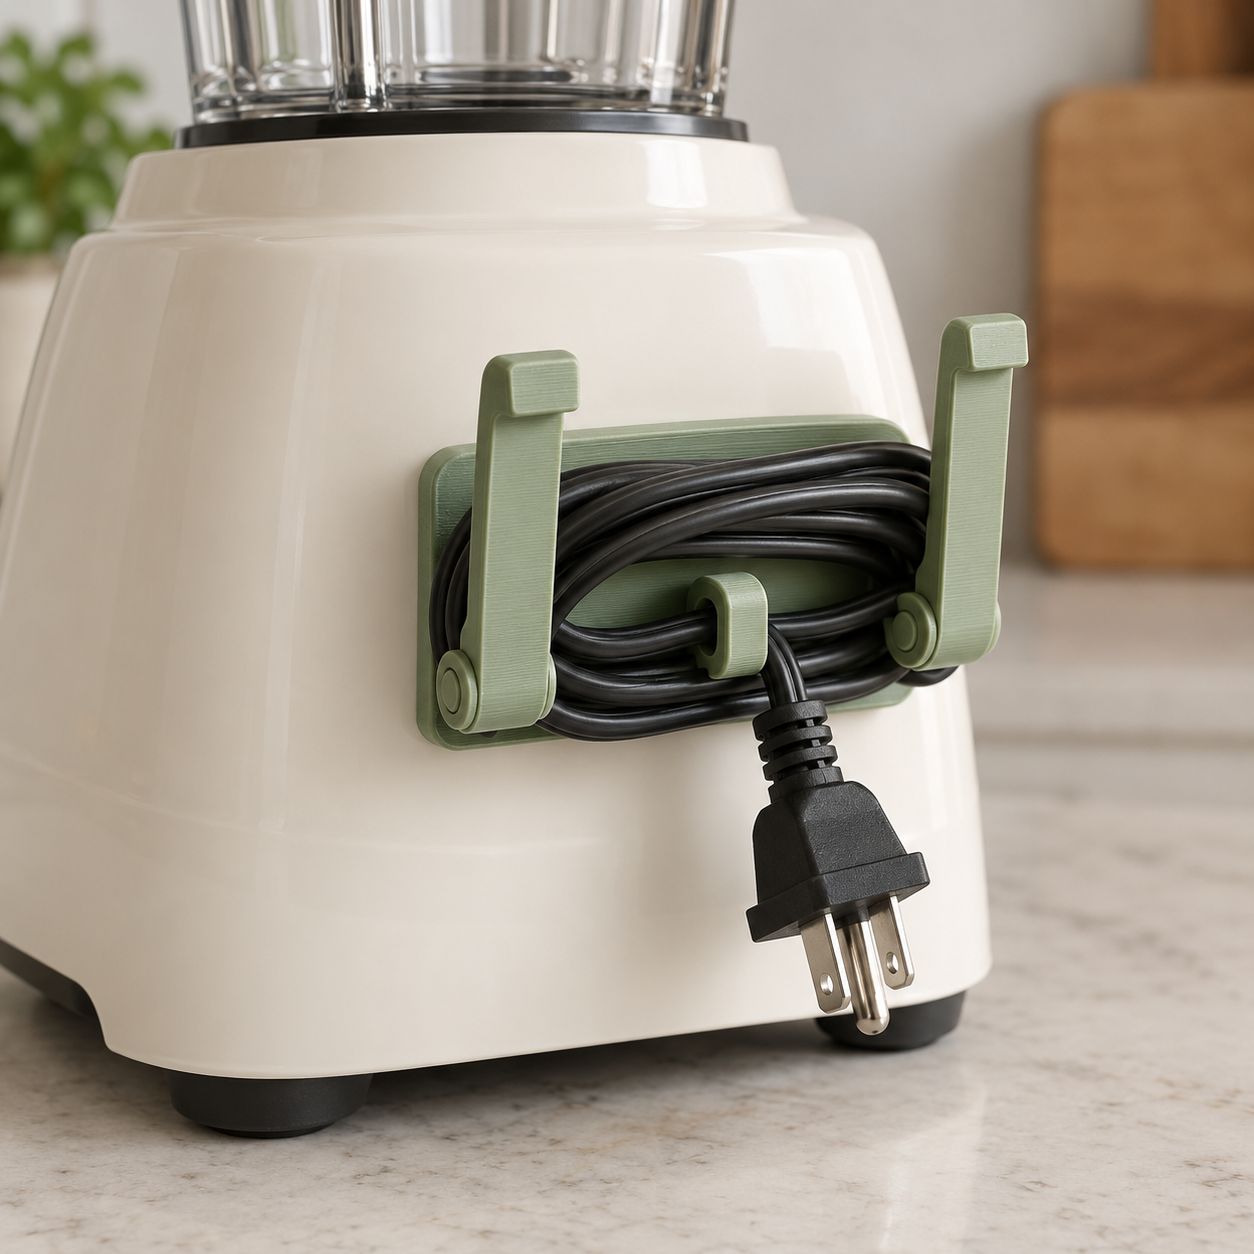
A stick-on cord winder for blenders, mixers and coffee makers whose two arms fold down when the cord is out, so the appliance still slides flush against the backsplash.
Fold-Down Appliance Cord Winder
A stick-on cord winder for blenders, mixers and coffee makers whose two arms fold down when the cord is out, so the appliance still slides flush against the backsplash.
Date: 2026-10-05 Category: Household Modeling difficulty: Intermediate Estimated print: ~0.8 h total · ~9 g PETG (estimate) Suggested price: $9–$14 printed pair · $3 digital file (estimate) Status: Concept
Description
A small base plate, 44 × 22 mm, sticks to the back or side of a countertop appliance with a patch of VHB tape. At each end, an arm hinges up to stand 38 mm off the surface. Wrap the cord around both arms, then clip the cord just behind the plug into the C-clip in the middle of the plate. When you're using the appliance, unwrap the cord and fold the arms flat. The winder then sticks out 16 mm instead of 38.
The arms only go one way. They fold outward to lie flat and stop at upright against two ears on the base. Cord tension pulls the arms toward each other, which presses them harder against the ears, so a wrapped cord holds them upright without a latch. Each arm ends in a squared lip that keeps the coils from sliding off.
The whole thing prints in one piece with the hinges already assembled, lying flat on the bed in its folded position. No supports, no hardware except the tape.
Why it sells
Stick-on cord winders are already a crowded file category, which tells you people want them. Printables has an adhesive "Cable Wrapper Organizer Management" (Printables 832343) and a cord wrapper made for curved or flat surfaces with no supports (Printables 652685). MakerWorld has a "Choose-Your-Size" cord wrap organizer (MakerWorld 638031), and a designer on Thangs sells flexible "Cable Loop" organizers as paid files (Thangs). Seller guides keep naming the category. Hyper3D's 2026 list of best-selling Etsy prints includes cable organizers and tech accessories (Hyper3D). StackSheriff's 2026 guide groups cable managers with drawer dividers and wall hooks as home-organization prints with high search volume and little labour per sale (StackSheriff). A craft-fair guide lists cable holders among the useful knickknacks worth bringing (Pixup3D).
The gap: the winders I found are fixed posts or flexible straps that stick out all the time. Fixed posts are the reason an appliance won't sit flat against the wall. This one folds down when the cord is out.
Who buys it
People tidying a kitchen counter, often in a small apartment where appliances live pushed against the backsplash. They find these on Etsy and Amazon while searching for "cord organizer for appliances" and usually buy a multi-pack for every appliance on the counter. Also a cheap housewarming add-on.
Design overview
- One-piece print-in-place part: base plate, two hinged arms, plug clip.
- Arms fold flat outward for storage and stop at upright against ears on the base. Cord tension locks them up. The fold-down arm is the feature the listed winders lack.
- Squared lip at each arm tip, 2 mm proud on both faces, keeps coils on.
- C-clip in the middle holds 6.5–8 mm cord just behind the plug.
- 44 × 22 mm footprint fits the back of most blender and mixer bases.
- PETG for heat tolerance near appliances; mounts with a 40 × 18 mm VHB patch.
Dimensions
| Measurement | Value (mm) | Notes |
|---|---|---|
| Overall width (X) | 104 | As printed, arms folded flat outward; 44 with arms upright |
| Overall depth (Y) | 22 | Base plate width |
| Overall height (Z) | 16 | As printed and folded (ear tops); 38 with arms upright |
| Wall thickness | 3 | Base plate |
| Base plate | 44 × 22 × 3 | Corner R 4 |
| Hinge axis position | x = ±18, z = 4 | Axis runs along Y |
| Knuckle diameter | 8 | Base and arm knuckles |
| Hinge pin diameter | 4 | Part of base; arm bore 4.7 |
| Arm knuckle length (Y) | 4.6 | y −2.3 to 2.3 |
| Base outer knuckle length (Y) | 4.35 | y ±2.65 to ±7, ×2 per hinge |
| Arm length from axis | 34 | Upright top at z = 38 |
| Arm bar section | 14 × 4 | Y width × thickness, from 4.35 to 34 out from the axis |
| Arm neck section | 4.6 × 4 | From 0 to 4.35 out from the axis |
| Arm tip lip | 14 × 8 × 5 | Y × thickness × length; 2 mm proud each face |
| Stop ears | 5.6 × 4.35 × 16 | X × Y × Z, x 10 to 15.6 (mirrored), ×2 per side |
| Plug clip block | 16 × 14 × 9 | x −8 to 8, y −7 to 7, z 3 to 12 |
| Clip bore | Ø7.5 | Along Y, center at x = 0, z = 8 |
| Clip mouth | 5.0 wide | Opens upward from the bore |
Parts list
| Part | Qty | Material | Size X×Y×Z (mm) | Print orientation | Supports |
|---|---|---|---|---|---|
| Cord winder (print-in-place: base, 2 arms, clip) | 1 | PETG | 104 × 22 × 16 | Base bottom down, arms flat outward | none |
Hardware and non-printed parts
- 3M VHB 5952 double-sided foam tape, 1.1 mm thick, cut to 40 × 18 mm ×1 per winder
- Isopropyl alcohol wipe for cleaning the appliance surface before mounting
Fits and tolerances
- Arm knuckle ↔ base hinge pin (print-in-place): Ø4.0 pin in a Ø4.7 bore, 0.35 mm per side, the middle of the usual 0.3–0.4 range. PETG strings and sticks more than PLA, so I didn't go tighter.
- Arm knuckle ↔ base outer knuckles (print-in-place, axial): 0.35 mm gap at each face (arm knuckle y ±2.3, base knuckles from y ±2.65).
- Arm knuckle ↔ base plate slot (print-in-place, radial): the plate is cut away from x 13.65 to 22 and y −2.65 to 2.65 under the arm knuckle, giving 0.35 mm around the knuckle's Ø8.
- Arm bar ↔ stop ears (contact stop): 0.4 mm gap as printed between the ears' outer face (x = 15.6) and the arm's inner face at upright (x = 16). The gap closes under cord load, and the ears take the force.
- Cord ↔ C-clip (snap): Ø7.5 bore with a 5.0 mm mouth. A 6.5–8 mm round appliance cord pushes through the mouth and is held. For flat or thin cords, use the variant clips.
Modeling guide
Origin: center of the base plate's bottom face, which is the face taped to the appliance. +X along the plate's length, +Y across it, +Z away from the mounting surface. The part is modeled and printed in its folded state, with the arms lying flat and pointing outward along ±X. Model the +X half, then mirror across the YZ plane.
- Base plate. Sketch on XY a rectangle x −22 to 22, y −11 to 11, corner R 4. Extrude 3.
- Knuckle slot. Sketch on XY a rectangle x 13.65 to 22, y −2.65 to 2.65. Cut through the plate (z 0 to 3). Mirror to −X.
- Base outer knuckles. On the XZ plane, sketch a Ø8 circle centered at (x 18, z 4). Extrude from y = 2.65 to y = 7, and again from y = −2.65 to y = −7. Union with the plate.
- Hinge pin. Same center, Ø4 circle, extruded from y = −7 to y = 7. Union with the outer knuckles. This becomes the pin the arm turns on.
- Stop ears. Sketch on XY two rectangles x 10 to 15.6, y 2.65 to 7 and y −7 to −2.65. Extrude from z 0 to z 16. Union.
- Arm knuckle (new body). On XZ, a Ø8 circle at (18, 4), extruded y −2.3 to 2.3. Cut a Ø4.7 bore on the same center through it. Keep it as a separate body from the base.
- Arm neck. Sketch on XZ a rectangle x 18 to 22.35, z 2 to 6. Extrude y −2.3 to 2.3. Join to the arm body.
- Arm bar. Sketch on XZ a rectangle x 22.35 to 52, z 2 to 6. Extrude y −7 to 7. Join to the arm body.
- Tip lip. Sketch on XZ a rectangle x 47 to 52, z 0 to 8. Extrude y −7 to 7. Join to the arm body.
- Check sweep. Rotate the arm body 90° about the axis (18, 4) toward +Z. Its inner face should sit at x = 16 against the ear faces at x = 15.6, with no intersection anywhere along the sweep. Rotate it back.
- Mirror the arm body and steps 2 to 5 to −X across the YZ plane.
- Plug clip. Sketch on XY a rectangle x −8 to 8, y −7 to 7. Extrude from z 3 to z 12. On XZ, cut a Ø7.5 circle at (0, 8) through along Y. Cut the mouth: rectangle x −2.5 to 2.5, z 8 to 12, through along Y. Chamfer the mouth's top edges 1 × 45°.
- Finish. Fillet R 1 on the arm bar's outer long edges and the lip's top edges. Leave all bottom edges square for the tape and first layer. Export the base and both arms as one STL; they stay separate bodies so the slicer keeps the 0.35 mm gaps.
Print settings
| Setting | Value |
|---|---|
| Material | PETG |
| Nozzle | 0.4 mm |
| Layer height | 0.16 mm (finer layers keep the 0.35 mm hinge gaps clean) |
| Walls / perimeters | 3 |
| Infill | 30% gyroid |
| Supports | None |
| Brim / adhesion | None; glue stick or textured PEI so PETG releases |
| Notes | The arm bar bridges about 25 mm between knuckle and tip lip; turn bridge cooling on. After printing, work each hinge back and forth a few times to break any stringing. |
Assembly
- Flex each arm from flat to upright five or six times until it swings freely.
- Clean the appliance surface with isopropyl alcohol and let it dry.
- Stick the VHB patch to the base plate's bottom face, then press the winder onto the appliance for 30 seconds, with the plate's long side horizontal.
- Leave it 24 hours before wrapping a cord, so the tape reaches full strength.
- To store: raise both arms, wrap the cord around them, and push the cord near the plug into the C-clip. To use: unclip, unwrap, fold the arms flat.
Variants and upsells
- Clip sizes: 6 mm and 9 mm bore versions for thin lamp cords and heavy kettle cords.
- Long arms: 50 mm arms for long cords on stand mixers and air fryers (must stay under 220 mm printed length: 44 + 2 × 50 = 144).
- TPU base: a curved-back version with a 1.2 mm TPU base for round appliances.
- Kitchen color packs: four winders in matching colors (white, sage, black, terracotta) at a pack price.
- Screw mount: two Ø3.5 countersunk holes for mounting on workshop tools and cabinets instead of tape.
Selling and distribution
Etsy fits the printed version best, sold in 2-, 4- and 6-packs, since buyers outfit every appliance at once. Include the tape patches pre-cut. MakerWorld and Printables suit the file, where the free cord-winder competition is heavy, so a $3 file needs the fold-down feature front and center in the first photo. Pricing: about 9 g of PETG and 0.8 h per winder, plus a tape patch, comes to well under $1 in materials each (estimate). A pair at $9–$14 covers Etsy fees and envelope shipping. Sell both. License the file CC BY-NC with a paid commercial license for print sellers.
Listing keywords: appliance cord organizer, cord winder, kitchen cord wrap, blender cord holder, mixer cord organizer, cable wrap stick on, fold down cord holder, countertop organization, cord keeper, kitchen organization gift, coffee maker cord wrap.
Risks and IP notes
- Heat near appliance vents softens plastic. Mitigation: PETG only (not PLA), and tell buyers never to mount it on toasters, air-fryer exhausts or kettle bases.
- Print-in-place hinges fuse on badly tuned printers. Mitigation: 0.35 mm gaps, 0.16 mm layers, and a note in the listing to print a test hinge first. Offer a 0.4 mm-gap file variant.
- Arms flop open when there's no cord. That's by design and harmless, but say so in the listing so buyers don't expect a detent.
- Saturated free-file category. Mitigation: sell multi-packs and color sets, and show the folded and upright states side by side in photos.
- IP check. Search design patents for "cord wrap" and "cord winder" before listing. Several commercial cord-wrap brands exist; never use their names in titles or tags.
Resource links
- Cable Wrapper Organizer Management (Printables 832343): adhesive cable winder file for appliances
- Cord Wrapper v1, curved or flat surface (Printables 652685): no-support stick-on cord wrapper
- 'Choose-Your-Size' Cord Wrap Organizer (MakerWorld 638031): sized cord wrap organizer on MakerWorld
- Cable Loop flexible cable organizers (Thangs): paid flexible cable organizer files
- 15 Best Selling 3D Printed Items on Etsy (Hyper3D): lists cable organizers and tech accessories as sellers
- Best 3D Prints to Sell on Etsy in 2026 (StackSheriff): home organization prints called high-search-volume and labour-light
- What to Sell at Your First Craft Fair as a 3D Printer (Pixup3D): cable holders among the useful items worth bringing
More from 3D Print Designs